This page shows how to install the ARP RV refrigerator vent fans. Installation of the ARP Control increases safety and reliability of Dometic and Norcold refrigerators. Installation of the ARP + Fan Control with cooling fans increases efficiency of your RV fridge.
Please click here to see Escapee Article: Your RV Refrigerator Part 5 - Removing the HeatInstructions: Subjects are listed on left. Click the link to the right to go directly to the subject matter on this page.
Please click here to see what other customers say about the ARP Control
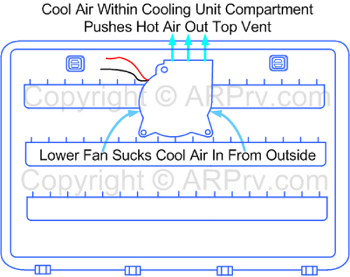
Our experience shows that installing the blower fan directly to the inside of the vent door is the best way for the fan to suck in cool air from outside and blow it up into the cooling unit compartment.
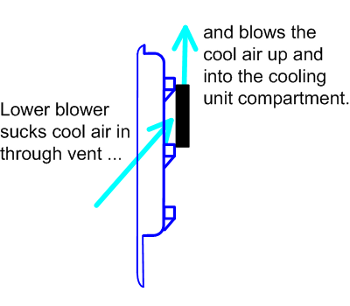
When an ARP blower fan is installed on the access door we put long wires on the blower fan so that the door can be remove and set down. This allows for unplugging the connection on the power wires.
Please view the graph above to see what percentage of customers reporting witnessed an efficiency increase in there fridge. Please be aware that this efficiency % value includes ARP non-fan controls:
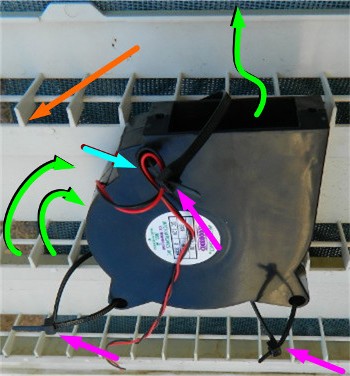
The blower can be attached to the door easily with nylon wire ties.
Orange Arrow: The orange arrow points to a vent bar, wrap the nylon cable ties around the large bars nearest to the blower fan.
Purple Arrows: The purple arrows point to the wire ties which are initially attached without tightening them down. This facilitates alignment and ease of fan install.
Blue Arrow: The blue arrow points to the power wire strain-relief. This is important to prevent damage to the wires inside the fan housing.
Green Arrows: These arrows are to illustrate how the blower intake should pull the cool air into the cooling unit compartment, and the cool air is pushed up from the exhaust of the fan.
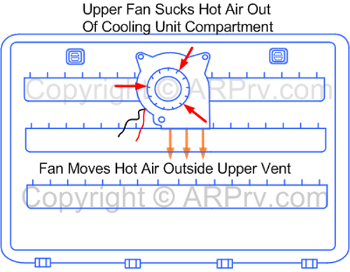
There are two methods for venting the top of the fridge cooling unit compartment. One is a roof vent and the other is the side vent. We will show a roof vent install below.
If your RV has a upper side vent we recommend a second blower fan mounted on the side vent door. The fan may be positioned so that the intake sucks the hot air from inside the cooling unit compartment and blows it out the door vent.
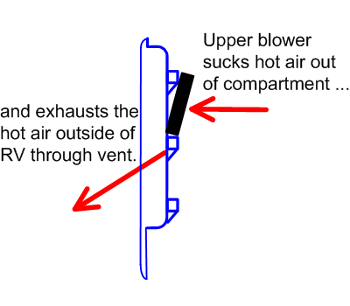
As with the bottom vent door nylon wire ties can mount the ARP blower fan to the upper cooling unit vent door.
In some RV fridge installs there is not enough room to install the fan in this manner. If this is the case, we usually mount the blower directly to the roof of the cooling unit compartment so that the hot air is blown out the vent.
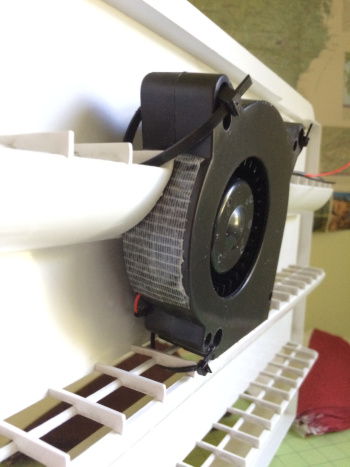
This image shows a blower fan mounted where there is low clearance between the vent door and the condenser. The installer needs to be creative at times, all RVs are made differently so some ingenuity on the installers behalf can help.
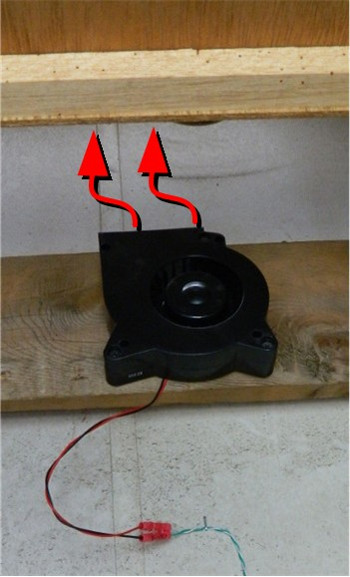
This photo shows a blower mounted in a roof vent application.
The fridge has been removed and the photo is taken from inside the RV looking at the outer wall. A channel is directly above the blower, at the top of the channel is the roof vent cap.
By removing the roof vent cap the fan can be installed in this manner. Please note the red arrows showing the direction of the hot air blowing out of the roof vent through the channel.
Please note that the power wires to the fan are strain-relived just below the wiring connector.
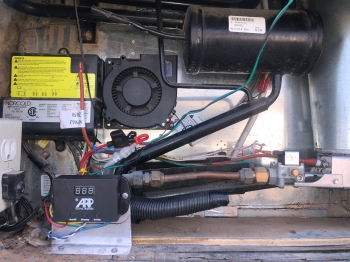
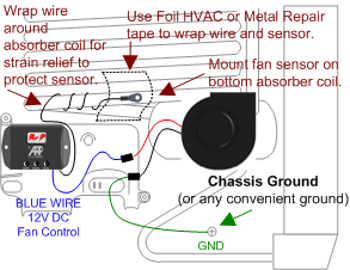
The ARP + Fan Control sensor resembles a ring type wiring
connector. We recommend attaching the sensor to the absorber
coils as seen in the drawing to the left, also see video below.
Start by wrapping the excess wire around the absorber coil for a strain relief.
Be careful with the sensor, do not tug on the wires.
General Purpose Foil HVAC tape or typical Metal Repair tape is used to secure the fan sensor. Tape has the advantage of insulting the sensor and securing the wire to prevent damage to the sensor. Wrap tape around the sensor and wire so that the wire is fastened to the tube and the sensor is insulated for best heat conduction.
The fan sensor can be mounted on either the first or second from bottom absorber coil. Sometimes the second absorber coil is hard to get to, thus the first coil is recommend in this situation. Also, the lower absorber coil is hotter than the second from bottom coil, thus one can do a rough adjustment for the temperature at which the fan kicks on by moving the sensor between the two coils.
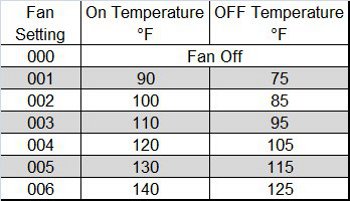
The temperature at which the fan will turn on is adjustable by using the ARP setup mode. The table to the left shows the fan setting number within the setup mode and the corresponding temperatures at which the fans will kick on and off. Please go to the downloadable PDF Troubleshooting Guide for your version of Fridge Defend. Within the Troubleshooting Guide, go to the 'Fan Setting' section for the table of settings for your version of Fridge Defend.
Please feel free to use the Contact Us form at the top or bottom of the page if you have any questions!
Please click this link to see ARP Video Operation Manual